Monday 30 April 2012

Plaid Cape

Here it is, finally! The plaid cape! I would have done this so much sooner (I had planned to do it a day or two after the 'sneak peak'), but I got sick. Very very sick. Think like, cold from hell. I couldn't think my head was so stuffed up; I couldn't breath my nose was so stuffed up; I couldn't speak my throat was so soar; I couldn't move my body was so achy. It was miserable. But, now it is mostly gone. It is determined to stick in there though, so I'm taking the day off today too. Hopefully I can take it easy enough today that my body kills the remnants of this evil bug, while also getting my chores done that I have been to sickly to manage. I have a bucket load of laundry that desperately needs doing and a room that looks like a tornado blew threw it ....

But enough of all that! Let's pretend I'm awesomely healthy and maybe positive thinking will help. They say it does. So, my awesomely healthy me is super proud of her cape. I fell in love with this plaid fabric when I saw it in Fabricville two months ago or so. I even paid almost full price. Well, 50% off, but it was still a whopping 12$ a meter! Needless to say I only got 2 meters .... But I just loved it so much I couldn't resist (I'm glad I didn't resist as it sold out at full price and never made it to the discount section). So many plaids are harsh and they're ok, there's nothing wrong with them. But THIS plaid is soft. It's a gradient plaid almost, I don't know how else to describe it. Plus it's 100% cotton and so soft and warm. Perfect for a spring/summer/fall coat, cause you know it's never warm enough here ... especially at night. It gets chilly, even in mid summer, and I always have to have a sweater. Well, no more! I now have this totally awesome cape instead!  

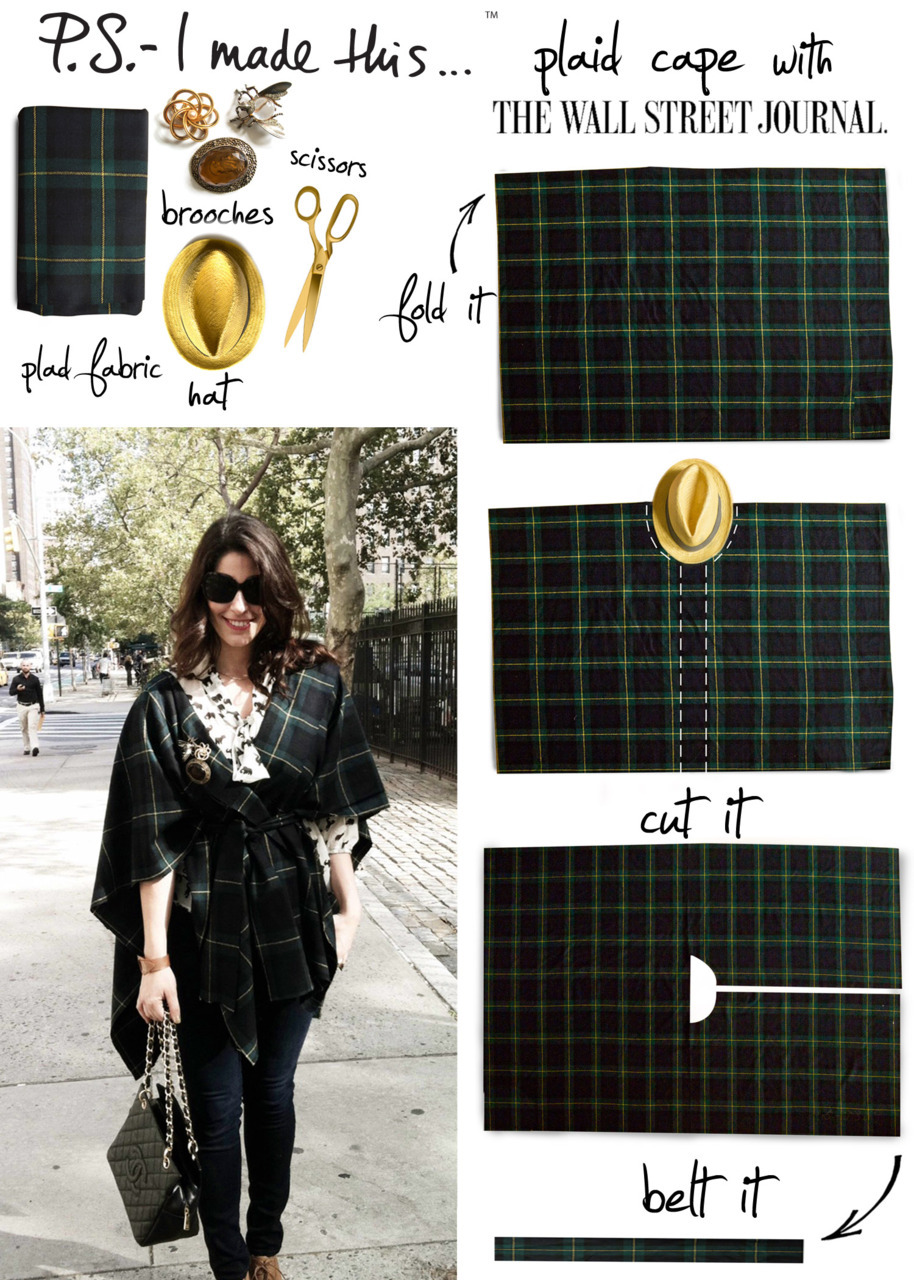
I found this blog called PS. I Made This. It has loads and loads and loads of easy tutorials. I spent ages going through them all and saving my favourites. One of which was for a plaid cape!

Don’t let superheros have all the fun.  It’s time you made yourself into a caped crusader.  I recently took my own advice when I spent the day with Elizabeth Holmes, who is quite the DIY queen herself, of The Wall Street Journal.  I dreamt up a must-have DIY cape which infused my favorite tartan plaid and the signature silhouette i love.  More behind the scenes snaPS with WSJ here!
To create, reach for your favorite cotton flannel or wool material.  You will need approx. 2 yards, depending on the size you desire.  First, fold material in half, horizontally.  Place a hat at the top of the fold (half way down).  This will serve as a neck-hole guide.  Continue to cut out a 4”inch panel.  Don’t throw away the scraps! Use the fabric scraps to create a strip which you can use as your belt.  P.S.- add fun brooches, and group in a  cluster, for a stunning finishing touch.  P.S.- Watch the DIY Video HERE.

 See how easy it is? Well, I did exactly as it said. I folded the fabric in half, cut out a half circle for my head and a slit. It looked fine, but it was kind of ... simple. No where near as glamorous as the model in the picture. It looked like a half-way finished project. I don't know if it's how I did it, or my fabric, or just me and my taste, but it just didn't seem to be enough.

So I altered it. The first thing I did was zig zag along ALL the edges, because this fabric, as gorgeous as it is, frays like crazy. Crazy frayage. No one wants to spend time sewing something up only to have it fray into nothing on them.
  
Next step, sew the sides closed. I wanted this for colder summer nights and it is meant to keep me a little warm, I didn't think having wind blow in the sides would help with that much. Sewing them closed was a super easy fix to that. I left a whopping 15" arm hole so I could keep that cape look and feel. I totally didn't think to take a picture where you can see the side seams, but I totally lucked out. I didn't know I would be sewing them shut when I cut it out, so I didn't line up the plaid at all. It doesn't line up perfectly, with black to black, but it does line up perfectly NOT perfect. If that makes sense. The white lines up perfectly with the black, and the black with the white. It alternates!

Step three, hem the arm holes. I just folded it over once and sewed it down. It looks like this from the right side.


Looks like a normal hem, but I didn't fold it over twice like normal, because again, didn't know I would be doing this, so didn't cut accordingly.


This is the view from the inside of the cape. Not spectacular, but at least the zig zagging gives it a somewhat finished look instead of just fraying fabric.

I really liked the length of the sleeve, it hits just above my elbow. Any shorter and it would look mis-fit, almost too small. So I'll have to content myself with folding just the once.  If I were to do it again, I'd add extra width for room to do a proper hem. Or just get wider fabric.

Step four, hem the bottom! This one I did do a proper hem. A very large proper hem. The original version was too long, so I used hemming as an excuse to shorten it. I used the plaid pattern as a guide for ironing and pinning it straight, then I sewed that sucker down.


The wobbly line of stitching is the first one, the small hem, so you can't see it from the right side of the cape. The zig zagging wasn't straight I guess so it threw it off when I tried to do the first small hem. The larger folded hem though went smoothly. I like how on the right side of the cape, the stitch line is so high up. I don't know why, it just looks cool.

Step 5, fix the front. I'm not sure how else to word it. The front part, where the neck circle meets the strip that's cut out, hangs awkwardly on me. I played around with it a bit, and found that my favourite look was when it was folded open.


See how they're open? I sewed them down like that so they're permanent. I found that placing them there was fine, if I didn't move. If I did however, they'd fall away or flap as I walked, like they were trying to fly away. So I figured if they were sewn shut that wouldn't be an issue. So that's exactly what I did.

I didn't want it to be folded over the whole way down, I wanted it to taper away near my waist. So I made some folds at my waist, pinned them in place, and sewed those down too.


I can't explain it so well, but you can see it clearly in the picture. It's like a lapel. It's wider at the top and tapers away near the middle. Except it's not cut that way, it's folded that way instead and the folds are sewn in place. I really like them. I like how they travel up to the top almost too. They give dimension, which is really cool.

Both of these above two pictures also show step 6, bias tape! I found that when I sewed the lapels down, they kind of faded. They didn't have that shadow under them anymore because they were flush with the rest of the cape, and they kind of disappeared. I wanted them to pop, so I sewed black bias tape along the edge. It goes along the neckline and down the front, although because the lapel folds under and tapers off, the bias tape disappears onto the wrong side.

I used black, because well, what other colour could I use? I want to be able to wear this with everything, and bright green bias tape would not only prevent that, but just look weird. I had a hard time with adding the bias tape to the corners of the neck piece. I cut them off and tried to fold them into that corner thing that looks awesome, but failed. They didn't close properly, so I ended up hand sewing a tiny piece of extra bias tape to them to hide the mistake.


I had to stitch it by hand because there were so many layers! The double folded fabric, the zig zagging, two layers of bias tape ... multiplied all by two at the corners ... my sewing machine refused. It would not sew it. So I ended up doing it by hand, which is why the stitches are a little ... off. My hand stitching skills are not good. I can never seem to make them even. They always look wonky.

I also had to hand stitch the bias tape along the bottom, near the hem too. For the same reason. Way to many folds of fabric.


If I had planned to do all this extra stuff, I'm sure there would have been a way to avoid the millions of layers of stuff that scared the sewing machine away. But I kind of went with the flow, adding things as I saw fit.

It turned out really well though I think. It's super cute! I wear it with my oversized infinity scarf and a skinny belt with a lace pattern on it. My boyfriend says it looks very Euro chic. Not quite the Nova Scotia style, but it's my style so that's even better. :D


Rupert likes it too.


Sunday 22 April 2012

Infinity scarf. Even if it isn't winter anymore

I know it's not winter, technically it's summer although you wouldn't believe it from the weather. Actually, that's not entirely true. The past couple days have been pretty nice. Below 20 still, but sunny at least. And after winter, 15 degrees feels warm.

Despite it being summer, I made an infinity scarf. Two actually. One is lighter, definitely more for summer. The other is oversized and heavier, more for chilly nights. They were pretty easy to make. Cut out a huge long rectangle, sew up the long side, then sew the short sides together. What no one mentioned though, is that when you sew the short sides together, there's a wrong way and a right way. I did it the wrong way, of course. So when I folded it open, the wrong side of the long seam was visible. More than visible actually, it stood out. Even something this simple I mess up. Sigh.

One thing I am very proud of though, in the summer version of the scarf, I matched up all the stripes so they align perfectly. Even along the long seam, I made sure that the seam ran halfway down two of the same stripes so when it's folded open it looks like a normal stripe.


Poor Rupert, he did not like having the scarf on him. He tried backing out of it until I captured him. He's a bit of a scaredy cat.

The oversized one was easier. I did it second, so I knew to make sure that when I sewed up the short ends I did it the right way so that the long seam was hidden on the inside. There were also no stripes to match up. It took a grand total of 20 minutes. I didn't even zig zag the endges cause I figured I probably won't wash it in reality. It's a scarf. Unless I drop food on it or something, and then I can always spot wash or hand wash it.


See, humongous. But I like the look. It even doubles as a hood when needed.


I made it to go with another project, my cape. It has a low front neckline and no hood, so this goes perfectly. It hangs down low and can fold up to protect me from rain! Here's a shot of it with the cape, my next project to blog about! So this is kind of like a sneak peak. :)


:)

Saturday 21 April 2012

The le sac dress ... or possibly the worst name for a dress ever.

If you were to buy things solely based upon their name, would you ever buy something called the "Le Sac Dress"? Probably not. It's a horrible name! Whoever came up with it sucks. Granted it's basically what the dress is, but why on earth would you name it that? Bad decision American Apparel. Bad decision.

Apart from the name however, the dress is actually pretty cute. It's like an infinity dress, but not. It can be made into lots of different styles using the long strap. Unlike the infinity dress, the le sac dress has only one strap, which makes the styles you can create with it different. It is however, just a sac. It's basically a tube with two holes, one for each arm. It's entirely the strap that makes it cute and have any shape to it whatsoever.

This is also the first time I have ever sewn with knit fabric. Ever. I read a bunch of blogs and helpful hints on how to sew with knits, but I have to admit I wasn't that scared. It seemed as if everyone was terrified of knit. I didn't get it. I still don't really. I'm going to chalk up my lack of knee weakening terror to the fact that I'm brand new to sewing and don't understand a lot of it. Every time I sew something there's something new involved that is bound to mess up at least once or twice. Surprisingly, nothing horrible happened. At all. No freak outs, no sewing blunders. It was weird. I am not used to sewing things and having it go smoothly. In my books, knits are pretty awesome. I mean, I didn't screw up! In any way! This is a first! Woohoo!!! :D

My first ever no-mess-up sewing experiment!


I wore it to work with the green sweater, because that building is cold!!! I wasn't sure it went until I took these pictures after work, it's actually pretty cute.
 

You'll have to excuse the bra straps, I wasn't that worried about them considering I had the sweater on all day.


The back isn't as pretty as the front, because the straps criss-cross weirdly at the top. But it's not horrible.

There are a bunch of ways to wear this dress. These are my favourites.


I didn't realize my hair covered this style. It's a halter neck, which you can tell from the back but is relatively hidden from the front. Sorry. You'll just have to take my word that it's cute.


You can see the ribbon really well in this picture. I sewed lace onto both sides of the ribbon to make it more feminine and cute. I really like the finished look of the ribbon, it's a little different and unusual and me. I could put lace on everything if you let me! :)


This isn't the belt I would actually wear with it. The one I wanted, an oatmeal colour knit stretch belt with a brown leather clasp in the front, was MIA.


I kind of prefer tossing the bow to the back instead of having it split between my front and back. It doesn't get in my way when I'm going about the day and it's a cute detail on the back.


My boyfriend likes this look best, strapless.


Sophie made it into this one too!

I think the main reason I didn't screw anything up was that it is so simple. I folded the fabric in half and sewed up the side leaving 8 inches as an arm hole and cut out 8 inches on the other side too so I could have two arm holes. Between the two arms I folded over the fabric two inches to make a loop that I threaded the ribbon through. The original tube I made ended up too big though so I had to cut a good 5 inches off both sides and sew it up again. Well worth it though. It looks much better now than it did as a humongous sac dress. It really did look just like a sac when it was too big.

I think knit fabric might be my favourite fabric now.  It doesn't fray. At all. So I didn't have to spend ages zig zaging it to make sure it didn't unravel on me. And zig zaging takes so much thread! I recently discovered a new section in my Fabricville. It's like the clearance, only it's just knits. And all the knits in this section are 2.99 a meter!!! I didn't find this fabric there, I paid a good 5$ per meter for this stuff. Now though, every time I enter Fabricville I bee line for the cheap knits! They keep adding new ones in to! So every time I find something new and pretty. I've also discovered a small shelf with tons and tons of lace, all 1$ for 3 meters!!! I just can't resist cheap and pretty.


Sunday 15 April 2012

Silky shell

So, as promised, here is the first of three! This is the one that had been started before but I fixed this weekend. The fabric puckered out at my underarms, so I fixed it. Only it took a week or so to get around to it after I finished it the first time... I can be lazy, I know.

Here it is without the pucker:


Please excuse the messy hair. This was after a long day at Clay Cafe and then out walking. Plus it was late at night and I was about to get ready for bed, so I wasn't going to fix it up only to sleep on it right away.


I wore this top all day and it was awesome. It's pretty soft and silky, and flows nicely. I wore it with the sweater all day though because let's face it, April in Canada is not actually very warm. Well, in Nova Scotia anyways.


It's pretty much a shell. It hangs off the girls and just drapes in place. It's not fitted at all, which is very unlike me. I tend to prefer things that give me some shape. Hence I wore a skinny belt over the sweater for most of the day. But as a basic shell it works pretty well.

I have some similar type fabric in different colours and some other patterns. I'll probably make some more of these, with a couple variations. I'll probably add elastic or shirring at the midsection on some, and others a bit longer into a tunic instead of a basic top. I was even thinking of adding a layer of ruffle at the neckline on one.


It looks a little uneven at the back, I know. It is a little uneven actually, but not as much as it looks here. I tried to do the curved edge thing, and that failed horribly. The fabric didn't want to fold that way when I was hemming. I later found out that actually rolling the fabric instead of folding it helps with that, so I'll have to try that next time.


I even used a double needle for this! To give it a more professional looking finish. It turned out really well. It makes this funky pattern on the back, and it's kind of hard to hem from the front side where you can't see the actually hem, but it's kind of worth it.


Of course, the part of the hem that is most obvious, the front neckline, is the one part I screwed up on with the double needle. I guess the fabric slipped and I ended up with the straps being slightly different sizes. The right one was thicker. Not good, not good at all. I couldn't leave it like that! And I did NOT want to rip out all the stitches on the neckline and redo them. That it only slipped once was a small miracle! That fabric is slippery man! Instead, I folded over the part that was to thick, pinned it in place, and sewed it up, with the double needle again so at least there would be consistency. I ended up with this:

 
It does this wonky thing where I started, but from afar it's almost impossible to tell. So I'm calling it a day. I totally forgot about it when I was wearing it the other day, and no one gave me weird looks because the strap of my top was messed. So it's all good in my books!

So there you have it, the first of three. I haven't photographed the other two yet, and I'm going to be heading to the gym soon, so I'll probably take them once I'm home and showered. For now, adios!
:)

Saturday 14 April 2012

Working working working

So in the past week, I have finished three separate pieces. Two from start to finish, and one that had been started earlier, which I 'fixed' and finished this week. So much sewing! And I have quite a few more plans in the works.

I'm horrible for starting a project, and then only getting around to finishing it much later. Usually after several other projects have been completed. Before the two newly started and finished pieces of this week, I had started four dresses: two are just cut out, and two are partly through the sewing part. And yet I pushed those aside to work on two brand new projects! Eventually I will finish these four dresses ..... it might just take a while.

The only reason I haven't posted my new creations is because I haven't taken pictures. But my lovely boyfriend is supposed to be bringing his camera on our date today so afterwards we can snap a few. I might even wear on of them!

In other news, I've sent in my application to teach in South Korea!! I'm waiting to hear back from them, and keeping my fingers crossed. I'm so nervous! I really want to go. I love Kumon, which is kind of like teaching but not. I want to actually teach, as in a class room. And I would love to visit and explore Korea! Two totally awesome things in one get up! I'm keeping my fingers AND my toes crossed for this one!

Until tomorrow when I will post an actual sewing adventure!

And just for fun, two pictures of my crazy pets:


Thursday 5 April 2012

Blue birdie dress


Whew it's been a hectic past few weeks! It's all done now, mostly. I finished and submitted my application to teach in South Korea, complete with lesson plan and essay. Now I just have to wait for my criminal record check to come through so I can send it off to be apostatized by the Korean embassy. Here's hoping that goes relatively quickly!

Either way, here is my latest sewing experiment! My blue birdie dress. I did this one up in a day. It was a gorgeous sunny day here, which never happens in March, and I wanted to wear something hand made. So I found this easy tutorial that I've since lost. I didn't book mark it for some reason, and now I can't find it again. Needless to say I didn't come up with this on my own, and when I find the tutorial I followed before, I will put up a link. Here's what came of the missing link though:

Say hi to Sophie! *the dog* 


It's so cute! And easy to wear, and easy to make. Cut a big rectangle, sew up the long side leaving room for your arms, and up one short side leaving room for your head, and voila! It's basically a big box, so a belt is needed, but as far as how easy it was to make ... definitely makes up for the box. I think it's pretty classy. Covers a lot but is still pretty.

I hemmed all the edges. I figured out how to do the zig zag stitch as a serger-like finish.


You can see how the edge is zig-zagged, then I folded it over and stitched it in place. This was for the skirt hem, for the sleeves I just left them as is:


Excuse the free threads, I cut those off afterwards. They're not there anymore.


That's the shoulder seam. Simple yeah? I didn't even cut out a shape for the neckline. It's just the straight opening in the fabric. I was worried it might aggravate my skin, because it's so high and my skin is ridiculously sensitive on my chest. Turns red at the slightest scratching. But so far so good. I wore this dress for a full day and I was totally fine. And the best part about the super high neck line? Apart from being cute and chic? No worries about accidentally flashing people!


I could wear this dress to teach in it's so no-show, yet pretty at the same time! It covers everything, from bust to legs. Teaching might require a blazer of some sort, and more sensible shoes, but for now, those aren't required. :)